In Issue 2 we will focus on getting your game’s main character (player) into the world you created in Issue 1! In order to do this, we do need to cover some tricky concepts. Issue 2 will be one of the most difficult issues for new developers but we encourage you to persevere, once you have understood the concepts in this Issue life will get easier!
1. Issue 1 revisited
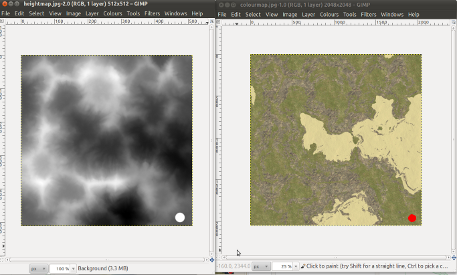
Those paying very close attention to Issue 1 may have noticed something odd happening. Consider the image below showing both a height map and texture map:

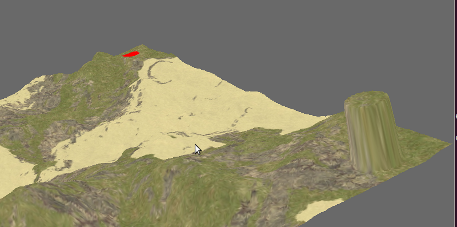
Notice the white dot and the red dot. You would, then, quite rightly expect the output to show a very high column with a red dot on the top. It doesn’t. Instead, you’ll see this:

Notice we have our nice high column but that the red dot is on the other side of the terrain! We actually raised this concern with the Panda3D community as a potential bug in the engine. Turns out to be more about convention and how one approaches terrain building in this way. You can see that discussion, if you interested, over on the Panda3D Forums. The main thing however is that we have a problem and we need to fix it. The fix is simple – flip the texture map vertically as outlined below.
2. Some basic image editing
If you have done image editing before you can skip this section and simply flip your image vertically. If you haven’t, keep reading! To edit an image you need an image editing application. There are many and they vary wildly in terms of functionality and price. As always at MGF Magazine, we prefer to stick with software that is free so you can get going right away with the minimum of fuss. Our recommendation is the GNU Image Manipulation Program (GIMP for short). While natively a Linux application, there are working ports for both Windows and Mac OS. The links are as follows:
If you run into problems with GIMP on Windows or Mac OS X, we consider the following alternatives worthy: Paint.NET (for MS Windows) and Seashore (for Mac OS).
Now, to fix our image, do the following (instructions assume you are using GIMP):
- File->Open, navigate to the folder containing the image and open it.
- Image->Transform, flip vertically.
- File->Overwrite
- Exit GIMP
3. Speed up for Issue 1 and some code explanation
In Issue 1, we indicated that the load time for your game might be quite high. We pointed out the main culprit as being the line in our code where we wrote “setBruteForce(True)”. This causes the Panda3D engine to render the entire terrain in full detail for us. Hence the delay. Now, you don’t always have to use the brute force approach. You can specify a Level of Detail (LOD). For example – we could specify a high LOD around where we position our in game camera (what the player sees). We could then lower the LOD on the surrounding area as it is not being viewed (your virtual world still ‘exists’ beyond what the camera sees). This improves game performance, your PC simply does not have to work as hard.
That said, for this game, we propose a far simpler method. The method above is more geared towards very large terrains. In our case, the game world is not that large. We don’t need levels of detail or terrain generation. What we need are 3D models. A 3D model can easily be loaded directly into our game – no ‘generation’ or levels of detail and much faster load times.
Alter your code from Issue 1 to match what you see below. There is only one change – the addition of the line 15 (beginning root.writeBamFile):
from direct.showbase.ShowBase import ShowBase   # the core of Panda3D
from panda3d.core import GeoMipTerrain          # Panda3D terrain library

class ShooterGame(ShowBase):                    # our 'class' ('object' recipe)
    def __init__(self):                         # initialise object
        ShowBase.__init__(self)                 # initialise panda3d
        terrain = GeoMipTerrain("worldTerrain") # create a terrain
        terrain.setHeightfield("heightmap.png") # set the height map
        terrain.setColorMap("texturemap.png")   # set the colour map
        terrain.setBruteforce(True)             # level of detail
        root = terrain.getRoot()                # capture root
        root.reparentTo(render)                 # render from root
        root.setSz(60)                          # maximum height
        terrain.generate()                      # generate terrain
        root.writeBamFile('world.bam')          # create 3D model

my_shooter_game = ShooterGame()                 # our object 'instance'
my_shooter_game.run()
Now run your game as normal. Once it is running, quit. Look in the directory where your mygame.py file resides. Notice that new file, “world.bam”? We just got the Panda3D engine to generate our terrain at the highest level of detail and then, once complete, write that out into a new file. In Panda3D there are essentially two model file types – BAM files as you just saw and EGG files which you will see soon. Don’t worry about the differences for now, all will become clear!
Having done this, we now need to modify our code to load the model instead of generating the terrain. Create a new Python file, save this one as mygame2.py or similar (while you no longer need the original file, mygame.py, we strongly recommend you keep it so that you can go through this process again in the future) and write it as follows:
from direct.showbase.ShowBase import ShowBase
from panda3d.core import GeoMipTerrain

class ShooterGame(ShowBase):
    def __init__(self):
        ShowBase.__init__(self)
        self.world = self.loader.loadModel("world.bam")
        self.world.reparentTo(self.render)

my_shooter_game = ShooterGame()
my_shooter_game.run()
Execute the program exactly as you did in Issue 1 (only launch mygame2.py and not your old version mygame.py!). Notice how quick that loaded? Add to that our now ‘much shorter’ program and progress is good, the code will do exactly the same as the code from Issue 1 only without the overhead of terrain generation on every execution. We will now explain to you what the code you wrote is doing line by line.
4. Understanding the Code
REMINDER: Indent your code using TABS or SPACES but be consistent, just use one or the other to avoid ‘indentation errors’.
Before we get going, take note that the last two lines of our code (both beginning ‘my_shooter_game’) are the only two lines of code that actually do anything! Everything prior you can consider to be ‘setup’. We have given the last two lines their own section in this Issue for clarity (see below). For now, before we delve into the rest of the code, remember that the first ‘my_shooter_game’ line creates an ‘object’ of type ‘ShooterGame’ while the second calls a ‘method’ named ‘run’ on that object. You do not need to understand that yet, but keep it in the back of your mind as you read the remainder of this quite tricky section!
from direct.showbase.ShowBase import ShowBase
At the start of any Python program you begin by ‘importing’ any Python libraries you may need. Think of it this way – if you did not explicitly import a library and libraries were always ‘just there’, you would end up with some massive executable programs where the vast majority of the code included was never used nor executed. The bottom line – only ever import what you need! ShowBase includes enough of the Panda3D library for us to get going. It also controls the program main loop (see below).
class ShooterGame(ShowBase):
….this line, early in the code, actually warrants the most explanation. Take a deep breath! The line declares a class. A class is a blueprint. It does nothing on its own, it simply ‘defines’ something. In this case, we have a class defining something called ‘ShooterGame’. We could have called it anything: ‘MGFApp’, ‘YourApp’, whatever, ‘ShooterGame’ is just the name of the class (blueprint!) we have chosen.
In computer programming a class is a blueprint for an ‘object’. An ‘object’ is considered to be an ‘instance’ of a class. Let’s see an example:
- we ‘define’ a class called MotorCar
- we create an ‘object’ called TheMGFCompanyCar
- the TheMGFCompanyCar is an ‘instance’ of a MotorCar.
(wishful thinking on our part, but hopefully makes things a little clearer)
In our code, everything below this line that is indented more than this line is considered part of this class definition (ShooterGame). The class definition ends when the indentation returns to the level at which this line is at .
This approach to programming (termed ‘object oriented’) might sound confusing at first but it is the most common approach in use today and for good reason. There are different approaches but the object oriented paradigm has many benefits. We will cover them briefly in the “Summary and Wrap Up” section of this issue.
Now, you probably noticed the ShowBase bit in the brackets. Ready for another concept? 🙂 This is something we call ‘inheritance’. Our ShooterGame class ‘inherits’ from the ShowBase class. What the heck does that mean!?! Well, using the example of a car again, we might see something like this:
class AlfaRomeoCar:
    # lots of things about the alfa car go here
    # ...that are applicable to ALL models

class 146(AlfaRomeo):
    # things _specific_ to the 146

class 156(AlfaRomeo):
    # things _specific_ to the 156
The class AlfaRomeoCar contains everything that is ‘common’ to all models. The 146 class ‘inherits’ the AlfaRomeoCar – it has everything that it has – but goes on to add some extra bits (specifics) to the 146 model. The 156 model does the same. Think about it – it would be a bit silly if the 146 and 156 blueprints ‘repeated’ the same common information. So they inherit from a common ‘parent class’ and are called ‘derived classes’.
In the case of our game – ShooterGame inherits from ShowBase. It has everything that ShowBase has and ‘more’ (the code we have written). ShowBase is a Panda3D class that does massive amounts of work for us – it contains the code that creates the window on your screen, updates it frame by frame, and so on. Hence the flying start we had in Issue 1!
So, looking forward, we know the next few lines will be defining our class, onwards!….
    def __init__(self):
        ShowBase.__init__(self)
        self.world = self.loader.loadModel("world.bam")
        self.world.reparentTo(self.render)
The word ‘def’ tells the Python interpreter that we are ‘defining’ a method for our class (in the non-object oriented world, you might hear people call this a function or procedure, but the correct terminology in our world is a method!). A method is a collection of code grouped together for a logical purpose. For example, the AlfaRomeoCar might have methods for ‘StartEngine’, ‘StopEngine’, ‘Accelerate’, ‘Brake’ and so on. Each method might have several lines of code and so, by grouping them together, life gets easier because we do not have to repeat code. To accelerate, we simply ‘call’ the Accelerate method. You’ll see this in action in a moment (yes, those last two lines again!).
Indentation is again very important. We noted previously that everything following the ‘class’ line that was indented more/further was part of the class. Likewise, everything that follows our ‘def’ line that is further indented is part of the method (which is part of the class, or a ‘class method’). Our method is short, only 3 lines, and is called “__init__”.
Uh-Oh, more lingo! In Python, the method named __init__ has a special purpose. It is called a ‘constructor’, and ‘init’ is short for initialise. Unlike other methods, the constructor is executed automatically the second we create an object of type ‘ShooterGame’. You do not have to explicitly ‘call’ the constructor as you would with other methods. Think of it as the ‘class setup method’. In the case of our car example the constructor might do things such as ‘set speed to zero’, ‘set engine off’, ‘set handbrake on’ etc.
The next line of code calls init on ShowBase. We just said you don’t have to call constructors so we would understand if that’s a head scratching call! The explanation is simple enough though. ShooterGame inherited (extended) from ShowBase . It then provided a constructor. As such, by default, the ShowBase constructor (or ‘parent constructor’) no longer applies because we provided a new one. But – the ShowBase constructor includes all manner of setup that is needed for our game! So we have to manually (explicitly) call it. It’s a quirk of inheritance but is actually sometimes very useful (there are instances where you might want to inherit, provide your own constructor, and completely ignore the parent constructor).
Next, we declare a variable – “self.world”. The word “self” crops up a lot, we’ll cover that in Issue 3. The variable name is ‘world’. Think of a variable as a box, a named entity that holds a value. Some examples are below:
a = 10 # a variable called 'a' created holding a value of 10 (an integer)
a = a+5 # the variable 'a' now holds the value of 15

b = "hello world" # 'b' is a variable holding a 'string' of characters
c = ShowBase() # 'c' is a variable holding an 'object' of type ShowBase
…and so, variables can hold most any value, even an instance of a class (object). In Python, once you have set an initial value on a variable you can never change the variables ‘type‘. Variable ‘a’ will always hold an integer (whole number), ‘b’ always a string (sequence of characters). If you try to change the type later in your code, you will get an error!
Tip: If you are not certain what type a variable should be when you declare it, you can simply write “myVariable = None”. In several other programming languages they term “None” as “Null”. In all cases, it means “nothing / not defined”.
So, ‘world’ gets a value of self.loader.loadModel(‘world.bam’). Remember our inheritance discussion? By inheriting from ShowBase our ShooterGame class already has a variable called loader. Loader is an object and one of its methods is ‘loadModel’. Thus, we load our model using the ‘loader’ object. loadModel returns ‘a handle’ to our new model – the world.bam that is being loaded, and so “self.world” contains the result of our model loading – it contains our world, our terrain (our 3D model) as an object (in this case, an object of type NodePath).
Next, we call ‘reparentTo’ on our world. Remember, world is an object, the NodePath class defines the method ‘reparentTo’. We ‘reparentTo’ to another object called ‘render’ (again, it exists by virtue of us inheriting ShowBase). The render object contains the Scene Graph. Very simply put, if something is to appear on the screen, it must have the scene graph as its parent!
5. Putting it all together, the last two lines of our code!
my_shooter_game = ShooterGame()
my_shooter_game.run()
The first line creates an object of type ShooterGame. This in turn automatically calls __init__ on the newly created object thus loading our world. The next line calls a method on our new object called ‘run’. Run is a method provided by the ShowBase class ShooterGame inheritied from. The run method starts the ‘game loop’, essentially updating the screen frame by frame, but it also handles tasks and events (we’ll see this later when we start adding, for example, keyboard controls to move your player around the world). That’s it! After all the preceding explanation, the bit of code that actually does something is really simple! …and there, you just saw, one of the many great benefits of Object Oriented programming!
6. Adding our Actor
The bit you have been waiting for!
For now, we are going to be using a model of SU27 Flanker aircraft. You can always change this to something else in the future (a space craft, a helicopter, whatever you desire) but it’s a bit too early to be discussing obtaining models, converting models, creating models and animating models. Yes, there’s a lot involved with models, and we’ll get to them in much greater detail in future issues.
You can download the flanker model using the links below. There are two files – the EGG file, and a texture file (remember, Panda3D models can be EGG or BAM files). Download both and save them into the same directory as your game:
(you may need to right-click and ‘save as’ depending on your operating system/browser)
Now update your code to look like this:
from direct.showbase.ShowBase import ShowBase

class ShooterGame(ShowBase):
    def __init__(self):
        ShowBase.__init__(self)
        self.world = self.loader.loadModel("world.bam")
        self.world.reparentTo(self.render)

        self.player = self.loader.loadModel("alliedflanker.egg")
        self.player.setPos(20,20,65)
        self.player.setH(225)
        self.player.reparentTo(self.render)

my_shooter_game = ShooterGame()
my_shooter_game.run()
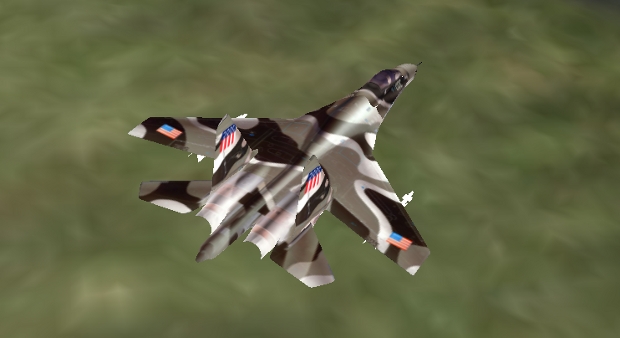
Run your game and move your camera around as you did in Issue 1. You should find your player hovering over the terrain. Like this:

In true MGF style, we’re not going to discuss this new code right now. We’ll open Issue 3 with a re-cap and explanation!
7. Wrap up and Summary
Yeah, we’re bad. We started out with the aim of adding your player – but we knew it required some tricky concepts and explanation and we kinda just hit you with them. The good news is it doesn’t really get any more difficult than this! If you can get your head around classes, objects, methods and variables you will have no problems in future issues!
We’ll leave you with an uber short summary of what you have just encountered (plus a little bit more!). It doesn’t have to make full sense now, but we feel the below summaries capture the whole idea of object oriented as succinctly as possible:
- Objects have Behaviour, Identity and State
- Classes offer Inheritance, Encapsulation and Polymorphism
…we’ll hit on each of the above again real soon!