Welcome back! In this issue you will learn how to add a sky to your game, add some lighting and some fog. You will create controls for your player and be able to fly around your 3D world, barrel roll, loop-the-loop and more! We’ll also dip into how the camera works and how to control it while also explaining how positioning and transformations work. With a further snippet on performance tuning there’s a lot to cover, so away we go…!
1. Position and Transformation
We left Issue 2 with our player positioned on the terrain but did not explain those last few lines of code. So here they are again:
        self.player = self.loader.loadModel("alliedflanker.egg")
        self.player.setPos(20,20,65)
        self.player.setH(225)
        self.player.reparentTo(self.render)
The first line should look familiar. The same way we loaded our world, we load the model for our player. Likewise, the fourth line, re-parents the player to render. Again, exactly as we did with our world in Issue 1.
Those other two lines do warrant some explanation. We first make a call to ‘setPos’ which, you may have guessed, sets the position of our player. Four values are given. The first one is our world. This is an important concept you will see time and time again with Panda3D. We are performing relative positioning. Position our player relative to the world. It’s a powerful approach – your game objects can be positioned, moved and oriented relative to each other.
Having said that, in this instance, you could completely omit the world parameter and just call setPos with the 3 numbers given! We do not specify the worlds position in our code and thus it defaults to 0,0,0 …making our relative positioning effectively normal positioning. That does not detract from the fact that it’s a very powerful concept, hence our inclusion in the code snippet.
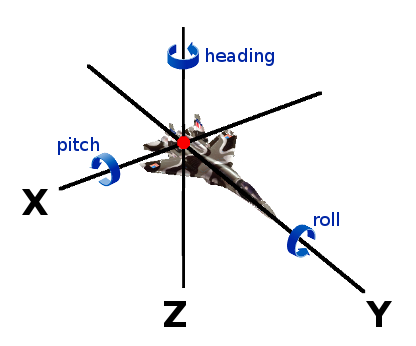
The remaining three values are X, Y and Z. The diagram shown should hopefully be self explanatory, note that where the 3 lines intersect, all values are zero. As such, XYZ values can be positive or negative:

You can also set these co-ordinates individually instead of all at once as we have done here. There’s a summary table below of what Panda3D API provides.
Next, that other line of code where we called ‘setH’. H is short for Heading (sometimes called Yaw). As well as having a position a model also has a ‘transformation’, again given by three numbers. Heading (H), Pitch (P) and Roll (R). As with position, we can set them individually or all at once. Refer back to the XYZ diagram above where we also marked out HPR and what the values do. We can even set position and transformation at the same time with one call. Below is a summary of the ‘set’ methods available for a models position, transformation and size (scale):
| Scale | Position | Transformation |
| setScale(sx,sy,sz) setSx(sx) setSy(sy) setSz(sz) | setPos(x,y,z) setX(x) setY(y) setZ(z) | setHpr(h,p,r) setH(h) setP(p) setR(r) |
| setPosHprScale(x,y,z,h,p,r,sx,sy,sz) …set all of them in one go! | ||
Try changing some of the values and re-run your game. Notice what happens. A large part of game development is trial and error! You should be able to re-position your player and also alter the orientation of your player. Remember, your world is 1024×1024 (refer back to our export settings in Issue 1 from L3DT) with a maximum terrain height (highest mountain peak) set to 60 – so it’s quite easy to position your player off the map, under the ground or hidden in a mountain by accident! Notice we set our initial player position above to 65 – making sure it was never hidden underground irrespective of XY values.
There are some tricks and techniques to positioning that we’ll cover in a future issue along with some other debugging techniques. For now, however, you will have to re-run your game every time you change the values to see what happens. What you are looking to find is your preferred ‘start position’ for the player. Ultimately, we’ll store this value in a ‘constant’ variable, but right now – the values are only used once in the whole code so it is not necessary (wise developers make the correct decision between over and under engineering a solution, they also recognise when it is time to re-engineer).