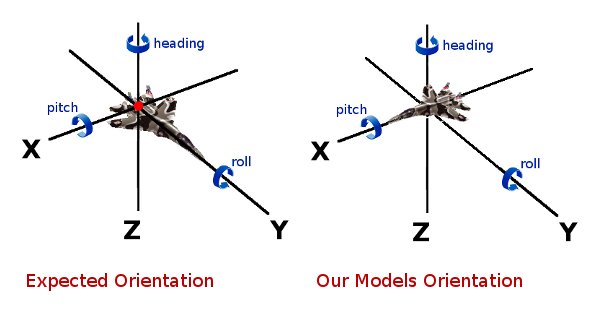
4. The Problem with our Model…
You’ll notice that we adjust X to fly forwards when you would expect to adjust Y! Try changing your code to Y instead and you’ll find you have a plane that flies sideways! You’ll also notice we adjust roll when climbing/falling where you would expect pitch…. and pitch for left/right where you would expect roll!
Why is this? It comes down to model orientation. You might argue that we provided you with a broken model in Issue 2. In a sense, you would be right. Our rebuttal however would simply state “assumptions are deadly”. There’s a lesson in this when it comes to programming – especially if you are using other people’s libraries or models!
The problem comes down to how the model is oriented. The image below shows what has happened here:

So we have to decide what to do, here are our options:
- Fix the model. This requires some 3D modelling. We haven’t covered creating 3D models yet so you can either head over to Google or discard this option for now.
- Swap the model. You could replace the model with a different one. We have not covered ‘acquiring/converting’ models so we’ll discard this too.
- Fix it via code. It can be done, but it’s a bit more advanced than we’d like to cover at this stage.
- Live with it. We like the model. So, our X is our Y and our Y is our X. Our pitch and roll are inverted too. We can still proceed though, just remembering to invert conventional logic for this particular model!
ERRATA:
There is a command line tool shipped with Panda3D that allows for rotational and positional transformation. See ‘egg-trans’ here: List of Panda3D Executables.
We’re going with Option 4. We are going to live with it. You are welcome to take whichever option you feel most comfortable with! If you choose to follow us, the ‘cheat sheet’ would be:
normally:
    to point the plane up to the sky or down to the ground - we adjust PITCH (P)
    to rotate the plane model left or right (banking) - we adjust ROLL (R)
    to move forwards or backwards we adjust Y
    to move left or right, we adjust X
with our model:
    to point the plane up to the sky or down to the ground - we adjust ROLL (R)
    to rotate the plane model left or right (banking) - we adjust PITCH (P)
    to move forwards or backwards we adjust X
    to move left or right, we adjust Y
in both cases:
    to point the plane left or right, we adjust HEADING (H or Y)
    to move up or down, we adjust Z
5. Ok, back to the code!
Slight tangent there, but we’re back with the code now. We covered climb and fall already. The next block in our code (lines 91-111) does a very similar thing only for moving left and right. We move the player and adjust the model transformation, this time adjusting the pitch (yes, you would expect it to be the roll here normally, as discussed above!).
Lines 113 to 124 deal with speed and moving the player forwards. If accelerate is pressed, increase the speed, up to but not above the ‘maxspeed’ we defined in our constructor. If decelerate is pressed, decrease speed down to but not below zero. We then move the player forwards by adjusting the X value (again, normally you would adjust Y here, but our model is what it is!).
Lines 126 to 132 define our ceiling and floor (maximum and minimum height). Notice that we relate our maximum height to what we defined as our maxdistance in the constructor when setting the camera lens far value. By using this value here to set the maximum height we avoid the scenario where the player flies so high into the sky that, upon descent, the ground simply cannot be seen (because it is further away than the camera lens far value!).
Finally, lines 134 to 143 deal with out world boundaries. Very simply, we just do not allow our player to fly off the terrain (world). If they go beyond the world edges, they are pulled back. We’ll make ‘the end of the world’ look a bit more interesting at a later stage.
And that ends the updatePlayer method! Phew, wasn’t too bad hopefully! That just leaves the one method – updateCamera. You will see (lines 145 to 148) that the camera position and transformation is set relative to the player. In other words, if we set the camera values as all zero, the camera would be in exactly the same position as the player. That wouldn’t be much use (you wouldn’t see the player) so we pull back a little and move a bit higher. You are probably wondering how we came up with the values you see there. All will be explained, in Issue 4!
Having now been through the code, we have one more stop in this issue: to add some lighting, a sky and some fog.