It’s time for some housekeeping before the New Year! We’re going to change the design of our code completely in this Issue to support us as we venture forwards in 2011. We’ll also take some time to explain the water we added in Issue 4 and add some sounds effects along with a basic HUD.
We have mentioned code refactoring a few times historically. As a project grows it becomes harder to maintain, especially when taking a rapid development approach as we have done to date. It is now time to see some of the benefits of Object Oriented programming in action. We first discussed this back in Issue 2 but only really in passing/preparation.
The game code is now growing. It’s around 300 or so lines of Python. If we continue down this path it is only going to get worse. The problem, in a nutshell, is that we have everything in one class (the ‘MyApp’ class). The solution, also in a nutshell, is to split this class into several. Before we do that we’ll discuss the key points surrounding Object Oriented programming.
Lastly, watch out for our other changes! During this refactoring we have made some alterations and improvements. Watch out for them, in particular our collision detection improvements and updated camera trickery!
1. Sets of Three
Objects and Classes: If you have not heard of either before please refer back to Issue 2 of MGF Magazine where we first introduced them. You might also find the search box at the top-right of this page useful for digging out material we have previously covered. If you’re impatient, the short version is that Classes are ‘object templates’ or ‘skeletons’ while Objects are instances of Classes (declared variables of a given Class type). For example, we might have a Class ‘HumanDNA’ and an instance ‘OzzyOsbourne’.
An Object has:
- An Identity. Every object has a name. The variable name. In your game currently we create an instance of ‘MyApp’ and assign it to a variable called ‘app’. Thus, we have one object of type ‘MyApp’ and its identity is ‘app’.
- Behaviour. When you call a method on an object you instigate a behaviour. In your ‘MyApp’ class there is a method called “createEnvironment”. When it is called (executed) it creates the environment. We control an objects behaviour by controlling what methods we call on it and when.
- A State. The state of an object is captured via its member variables. For example, in ‘MyApp’ we keep track of the players speed via a variable – self.speed. The ‘state’ of an object is a snap-shot of all of its member variables and their values at any given moment.
Object Oriented programming allows for:
- Inheritance. As discussed back in Issue 2, a class can ‘inherit’ from a parent. The derived class has everything the parent class has ‘plus more’. MyApp inherits from ShowBase in your code – which is why the game window is automatically created for you (amongst other things!). ShowBase does a lot of things for us leaving us to concentrate mainly on game logic. Parent classes tend to hold ‘common case’ code while derived classes implement ‘specific cases’ (e.g., a 3D shoot em’ up as we are writing here!). Using our ‘HumanDNA’ example from above we might have a base class ‘DNA’. We could derive a new class ‘BipedDNA’ from which ‘HumanDNA’ would inherit as would ‘MonkeyDNA’. Whole ‘class trees’ can be defined in this way. All common code is abstracted into parent classes while specifics fall into derived classes. It is not, however, clear cut. There is nothing to stop us having an instance of ‘BipedDNA’. Despite it being a parent for HumanDNA and MonkeyDNA, it is still a class in its own right and an object of that type can be declared (there is the notion of an abstract base class, that cannot be instantiated, but it’s out of scope for now!).
- Encapsulation. Otherwise known as ‘data hiding’. We have not yet discussed this in any detail. Using our summary of objects from above, encapsulation implies we should only interact with our objects via their behaviours (methods). Their underlying data (state) is not something we should have to worry about. For example, if we had a Car object we might want to simply say “car.accelerate()”. We don’t care what is going on internally in the accelerate behaviour. We don’t care what variables are involved or used in the Car object itself. The Car is like a black box – we interact with it via its interface (methods) but do not actually care how it works internally so long as it works! You’ll see why this is important below when we discuss maintainability.
- Polymorphism. A big word that essentially means “same interface, different behaviour”. Polymorphism is implemented using inheritance. Suppose you were writing a drawing application. The user can select to draw circles, squares, trapezoids (etc.) on the screen, drag them around, reposition, rescale and so on. In the code, it would make sense to keep all of the shapes together in one data structure (variable) for ease of access. In Python, we can achieve this via a list. You’ll recall we introduced dictionaries in Issue 3 as name/value pairs. A list is similar but is just values. Both are really types of what we call ‘arrays’ in programming. An array is a collection of values where items are accessed via indices. All of this is best illustrated with a code snippet:
class Shape:
    def __init__(self,name):
        self.name = name

    def draw(self):
        # nothing to do
        pass

class Square(Shape):
    def draw(self):
        # some code to draw a square on screen

class Circle(Animal):
    def draw(self):
        # draw circle on screen

shapes = [Square('mysquare1'),
          Circle('mycircle1'),
          Square('mysquare2')]

for shape in shapes:
    shape.draw()

# the above code would draw 2 squares
# and 1 circle on the screen
Running through the code, we begin declaring a Shape class. It has a ‘draw’ method that doesn’t do anything. We then have Square and Circle. Two new classes, both of which inherit from Shape. Thus, they provide everything Shape does and ‘a bit more’. They too provide a ‘draw’ method, only this time, it does something. For Square it draws a square, for Circle it draws a circle. Their methods override the version provided by the parent (Shape).
As an aside, it would be possible for either or both of Square and Circle to, in their draw methods, call the parent (Shape) draw method. You’ve done this already in the second line of your MyApp class where you called the ShowBase constructor. It’s not necessary in this case (example) but we thought it note worthy because it highlights that overriding is not the same as replacing.
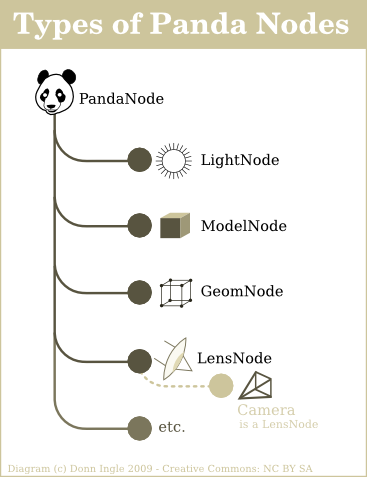
We then create a list containing 3 shapes. Two squares, one circle. In a similar way as to how we iterated over our collision queue in Issue 4 we now iterate over our list of shapes. For each one, we simply call ‘draw’. We do not care whether or not it is a Square, Circle, whatever. In fact, we probably wouldn’t even know. In the ‘real world’ case of our drawing application the user can draw however many circles and squares they want in any permutation (order). ….and that’s it! Polymorphism is “same interface, different behaviour”. It is, however, a seriously powerful concept! You’ve used it already without even knowing. Remember our discussion of PandaNodes? That’s how they work. It doesn’t matter whether it’s a model, light, lens or ‘whatever’, they all support the same interface (setPos, getPos, etc.). Behind the scenes, the PandaNode is the base class while the others are derived from it:
Concepts out of the way, what are the benefits?
- Reuse. A good design will lend itself to reuse. If you had created a ‘Car’ class or ‘HumanDNA’ or ‘whatever’, wouldn’t it be nice if you could take the same class and use it in multiple projects? That is reuse. Inheritance is also reuse, separating the common code in a single application so it is not repeated. Repeating code is generally a bad idea because if the code turns out to be wrong or needs changing for some other reason, you have to locate all occurrences and change them. Always aim for a ‘single point of change’ when coding! In our game, we have a fighter plane, there is no reason why the same fighter plane could not be used in a completely different and unrelated project.
- Extensibility. We might not be able to directly use our fighter plane in a different project, it might not be exactly right. That does not stop us from creating a new class that inherits from our fighter plane and addresses its short-comings. A good design is easy to extend.
- Maintainability. As you have already seen, the game in development has become increasingly difficult to work with and maintain. By splitting out into multiple classes we find ourselves with a code base that is easier to work with and maintain. The bottom line is ‘code readability’. Going back to encapsulation, suppose we discovered that most of the code in ‘HumanDNA’ was wrong. We rewrite the entire class. It should have absolutely no impact on any other part of the project at hand so long as the interface (methods and their parameters) stays the same. Again, it is the black box “don’t know, don’t care” approach. It is for this reason you should always use methods to access member variables as opposed to directly changing an objects internal state. Using the fighter plane example, suppose the rewrite resulted in “no need for a speed variable”. If you had referenced that elsewhere in your code it would now fail. Always interact with an object via its methods only wherever possible.
Before we proceed it is worth mentioning two further concepts – Cohesion and Coupling. Keep both in mind whenever you are at the design stage of a project. Object oriented designs should be loosely coupled but highly cohesive. The fighter plane class is of little use in any other project if it depends on other parts of the game/project it was first created in. If there are dependencies that make it hard to reuse a class, it is said to be tightly coupled. Cohesion is exactly as it sounds – your objects working together in (as close is as possible to) perfect harmony. Your design should make logical sense and be cohesive. Sometimes, people develop all manner of classes and interactions that do not make sense and are not efficient. Your design should use suitable relationships and interactions (only) between objects that need it. In summary, your design should make good logical sense but should not forge dependencies wherever possible.
2. Our New Design
….is by no means our final design! Yes, refactoring again. 🙂 We are going to do enough to make our game supportable for the foreseeable future. Again, as we have said before, there is a balance between over and under engineering a solution. We also do not want to run too far ahead as we realise there have been some fairly heavy concepts to absorb in our short five Issues to date!
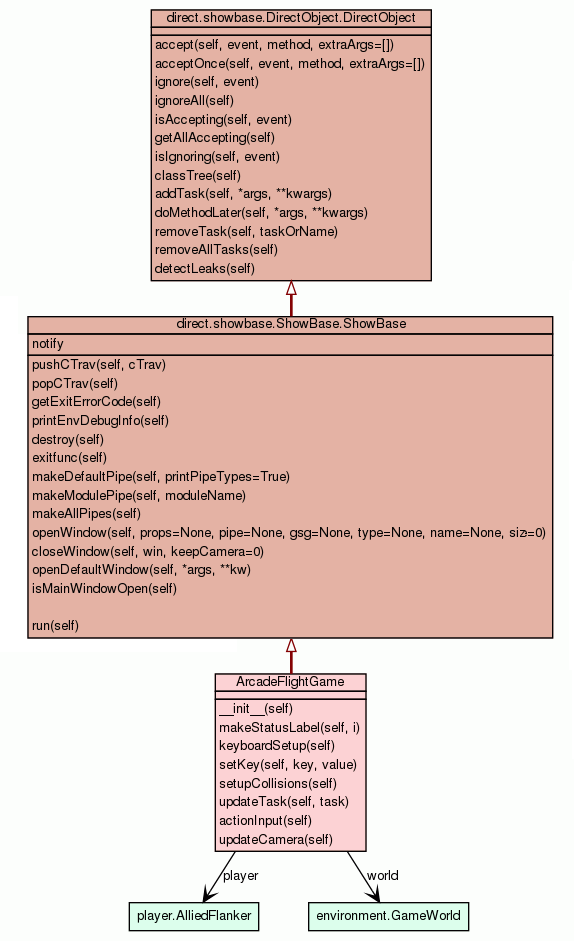
The diagram above summarises our aim and design. Our application already inherits from ShowBase so that should not be new (the hollow triangle in the diagram). We have also shown that ShowBase actually inherits from DirectObject. This is new! DirectObject and ShowBase are both parts of the Panda3D library. You can start an application by inheriting from either. We chose ShowBase way back in Issue 1 because it does what DirectObject does “plus a bit extra”. The key parts of the diagram are our changes (from ArcadeFlightGame down in the diagram). In short they amount to:
- Get rid of the MyApp class and replace that with an ArcadeFlightGame class. The new class is responsible for our game logic.
- Add an AlliedFlanker class to deal with everything player related. Moving, exploding, rotating (etc.). The new ArcadeFlightGame class should simply have to call methods (behaviours) on an object of type AlliedFlanker.
- Add a GameWorld class to deal with the terrain, lighting, sky and anything else pertaining to the ‘world’. The ArcadeFlightGame class should simply create a GameWorld object.
3. Refactor!
Again, as we pointed out above, watch out for the other changes and improvements we are making as we refactor! First, create a new folder somewhere on your PC. Copy your models and textures into the this new directory following the folder hierarchy/structure below:
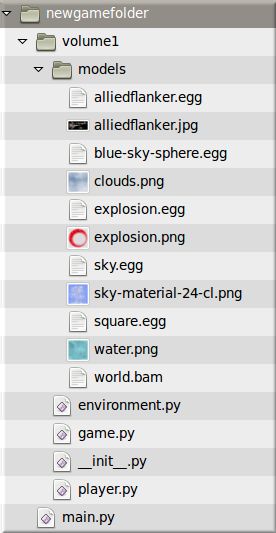
You should already have all the files for the ‘models’ directory. For the Python (.py) files, just create empty files in a text editor for now (keeping to the file names as per above). We will provide the code for each file below along with some explanations.
newgamefolder/volume1/__init__.py
You actually leave this as a completely empty file! It tells the Python Interpreter that the directory Volume 1 is to be treated as a ‘package’. A package is a collection of modules. This is needed for the ‘dotted module name’ import syntax to work (as discussed right at the start of Issue 4).
newgamefolder/volume1/environment.py
from panda3d.core import AmbientLight, DirectionalLight, Vec4, Fog
from panda3d.core import Texture, TextureStage
from pandac.PandaModules import CompassEffect
from pandac.PandaModules import VBase4, TransparencyAttrib
from direct.interval.LerpInterval import LerpTexOffsetInterval, LerpPosInterval

class GameWorld():
    def __init__(self,size,loader,scenegraph,camera):
        self.worldsize = size
        self.loader = loader
        self.render = scenegraph
        self.camera = camera
        self.world = self.loader.loadModel("volume1/models/world.bam")
        # the model is 1024 already, so we scale accordingly:
        self.world.setScale(self.worldsize/1024)
        self.world.setPos(0,0,0)
        self.world.reparentTo(self.render)
        self.__createEnvironment()

    # private method
    def __createEnvironment(self):
        # Fog
        expfog = Fog("scene-wide-fog")
        expfog.setColor(0.5,0.5,0.5)
        expfog.setExpDensity(0.002)
        self.render.setFog(expfog)

        # Our sky
        skysphere = self.loader.loadModel('volume1/models/blue-sky-sphere')
        skysphere.setEffect(CompassEffect.make(self.render))
        skysphere.setScale(0.08)
        # NOT render or you'll fly through the sky!:
        skysphere.reparentTo(self.camera)

        # Our lighting
        ambientLight = AmbientLight("ambientLight")
        ambientLight.setColor(Vec4(.6, .6, .6, 1))
        self.render.setLight(self.render.attachNewNode(ambientLight))

        directionalLight = DirectionalLight("directionalLight")
        directionalLight.setColor(VBase4(0.8, 0.8, 0.5, 1))
        dlnp = self.render.attachNewNode(directionalLight)
        dlnp.setPos(0,0,260)
        dlnp.setHpr(225,-60,0)#lookAt(self.player)
        self.render.setLight(dlnp)

        # water
        self.water = self.loader.loadModel('volume1/models/square.egg')
        self.water.setSx(self.worldsize* 2)
        self.water.setSy(self.worldsize*2)
        self.water.setPos(self.worldsize/2,self.worldsize/2,18) # sea level
        self.water.setTransparency(TransparencyAttrib.MAlpha)
        nTS = TextureStage('1')
        self.water.setTexture(nTS,self.loader.loadTexture('volume1/models/water.png'))
        self.water.setTexScale(nTS,4)
        self.water.reparentTo(self.render)
        LerpTexOffsetInterval(self.water,200,(1,0),(0,0),textureStage=nTS).loop()

    def setGroundMask(self,mask):
        self.world.setCollideMask(mask)

    def setWaterMask(self,mask):
        self.water.setCollideMask(mask)

    def getSize(self):
        return self.worldsize
For the most part, this should look reasonably familiar. We have just moved all the environment related code out of MyApp into its own class called GameWorld. There are a few new methods at the bottom that are new and you will see why they are needed as we progress. We’re essentially wrapping up the environment code and providing an interface via those new methods. You’ll notice that the __createEnvironment method name starts with two underscores (__). This makes the method a private method. Private methods can only be used ‘within the class itself’. The constructor calls __createEnvironment and that is fine. But this would be an error:
someVar = GameWorld()
someVar.__createEnvironment() # would NOT be allowed
Private methods are useful in the situation where you feel a class needs a method – but only for internal use. You can do the same with member variables, make them private via a double-underscore prefix. Sadly, in Python, it’s a bit of a hack under the hood. The double-underscore prefix actually causes something called name mangling (to be discussed in the future!). Private variables, with a bit of code magic, can still always be accessed and modified. Other languages are stricter about this. Methods that are not private are termed ‘public’. Some other languages offer further levels of control (e.g., C++ allows for ‘protected’ variables and methods), Python does not.
newgamefolder/volume1/player.py
from panda3d.core import Vec3
from direct.task import Task
from pandac.PandaModules import VBase3

class AlliedFlanker():
    def __init__(self,loader,scenegraph,taskMgr):
        self.loader = loader
        self.render = scenegraph
        self.taskMgr = taskMgr
        self.maxspeed = 200.0
        self.speed = 0
        self.startPos = Vec3(200,200,100)
        self.startHpr = Vec3(225,0,0)
        self.player = self.loader.loadModel("volume1/models/alliedflanker")
        self.player.setScale(.2,.2,.2)
        self.player.reparentTo(self.render)
        self.reset()
        self.calculate()

        # load the explosion ring
        self.explosionModel = self.loader.loadModel('volume1/models/explosion')
        self.explosionModel.reparentTo(self.render)
        self.explosionModel.setScale(0.0)
        self.explosionModel.setLightOff()
        # only one explosion at a time:
        self.exploding = False
        self.maxdistance = 400 # default in case below never called

    def setMaxHeight(self,distance):
        """ Maximum flying altitude """
        self.maxdistance = distance

    def reset(self):
        """ Back to start position, orientation, speed """
        self.player.show()
        self.player.setPos(self.startPos)
        self.player.setHpr(self.startHpr)
        self.speed = self.maxspeed/5

    def calculate(self):
        """ Should be called every frame.
        It calculates how the player should move (position and orientation) """
        self.factor = globalClock.getDt()
        self.scalefactor = self.factor *self.speed
        self.climbfactor = self.scalefactor * 0.3
        self.bankfactor  = self.scalefactor
        self.speedfactor = self.scalefactor * 2.9
        self.gravityfactor = ((self.maxspeed-self.speed)/100.0)*1.35

    # note the collision enhancements
    def climb(self):
        if (self.speed > 0):
            # faster you go, quicker you climb
            self.player.setFluidZ(self.player.getZ()+self.climbfactor)
            self.player.setR(self.player.getR()+(0.5*self.climbfactor))
            # quickest return: (avoids uncoil/unwind)
            if (self.player.getR() >= 180):
                self.player.setR(-180)

    def dive(self):
        if (self.speed > 0):
            self.player.setFluidZ(self.player.getZ()-self.climbfactor)
            self.player.setR(self.player.getR()-(0.5*self.climbfactor))
            # quickest return:
            if (self.player.getR() <= -180):
                self.player.setR(180)

    def unwindVertical(self):
        """ Used to return the aircraft to its default orientation, it would
        look odd after a climb/fall if the plane stayed pointed up/down! """
        if (self.player.getR() > 0):
                self.player.setR(self.player.getR()-(self.climbfactor+0.1))
                if (self.player.getR() < 0):
                    self.player.setR(0) # avoid jitter
        elif (self.player.getR() < 0):
                self.player.setR(self.player.getR()+(self.climbfactor+0.1))
                if (self.player.getR() > 0):
                    self.player.setR(0)

    def bankLeft(self):
        if (self.speed > 0):
            self.player.setH(self.player.getH()+self.bankfactor)
            self.player.setP(self.player.getP()+self.bankfactor)
            # quickest return:
            if (self.player.getP() >= 180):
                self.player.setP(-180)

    def bankRight(self):
        if (self.speed > 0):
            self.player.setH(self.player.getH()-self.bankfactor)
            self.player.setP(self.player.getP()-self.bankfactor)
            if (self.player.getP() <= -180):
                self.player.setP(180)

    def unwindHorizontal(self):
        """ Used to return the aircraft to its default orientation,
        it would look odd after banking if the plane stayed tilted! """
        if (self.player.getP() > 0):
                self.player.setP(self.player.getP()-(self.bankfactor+0.1))
                if (self.player.getP() < 0):
                    self.player.setP(0)
        elif (self.player.getP() < 0):
                self.player.setP(self.player.getP()+(self.bankfactor+0.1))
                if (self.player.getP() > 0):
                    self.player.setP(0)

    def move(self,boundingBox):
        # move forwards - our X/Y is inverted, see the issue
        valid = True
        if self.exploding == False:
            self.player.setFluidX(self.player,-self.speedfactor)
            valid = self.__inBounds(boundingBox)
            self.player.setFluidZ(self.player,-self.gravityfactor)
        return valid

    def __inBounds(self,boundingBox):
        if (self.player.getZ() > self.maxdistance):
            self.player.setZ(self.maxdistance)
        elif (self.player.getZ() < 0):
            self.player.setZ(0)

        # and now the X/Y world boundaries:
        valid = True
        if (self.player.getX() < 0):
            self.player.setX(0)
            valid = False
        elif (self.player.getX() > boundingBox):
            self.player.setX(boundingBox)
            valid = False
        if (self.player.getY() < 0):
            self.player.setY(0)
            valid = False
        elif (self.player.getY() > boundingBox):
            self.player.setY(boundingBox)
            valid = False
        return valid

    def accelerate(self):
        self.speed += 1
        if (self.speed > self.maxspeed):
            self.speed = self.maxspeed

    def brake(self):
        self.speed -= 1
        if (self.speed < 0.0):
            self.speed = 0.0

    def die(self):
        if (self.exploding == False):
            self.player.setZ(self.player.getZ()+10)
            self.exploding = True
            self.explosionModel.setPosHpr(Vec3(self.player.getX(),self.player.getY(), \
                                   self.player.getZ()),Vec3( self.player.getH(),0,0))
            self.player.hide()
            self.taskMgr.add(self.__expandExplosion,'expandExplosion')

    def __expandExplosion(self,Task):
        # expand the explosion ring each frame until a certain size
        if self.explosionModel.getScale( ) < VBase3( 60.0, 60.0, 60.0 ):
            scale = self.explosionModel.getScale()
            scale = scale + VBase3( self.factor*40, self.factor*40, self.factor*40 )
            self.explosionModel.setScale(scale)
            return Task.cont
        else:
            self.explosionModel.setScale(0)
            self.exploding = False
            self.reset()
            # and it stops the task

    def __speedAsPercentage(self):
        # needed for camera trick
        return (self.speed/self.maxspeed)

    def attach(self,node):
        return self.player.attachNewNode(node)

    # See Issue 5 video for what this does:
    def lookAtMe(self,camera):
        percent = (self.__speedAsPercentage())*2
        camera.setPos(self.player, 9+(20*percent), 0, 0)
        # compensate for model problem (see Issue 3)
        camera.setH(self.player.getH()+90)
        camera.setP(self.player.getR())
        camera.setR(self.player.getP())
        # final adjustments
        camera.setZ(self.player,3)
        camera.setY(self.player,1.5)
Essentially, everything player related (including the model) is in the new class above. There are some changes to watch out for though. First, notice the use of ‘setFluid’ methods in place of ‘set’. These methods are useful when dealing with fast moving objects. You may have noticed the occasional collision blip in Issue 4. This happens when an object is moving so fast and so far frame by frame that it skips over the collision point. The player might be slightly above the terrain while, in the next frame, slightly below. Thus missing the collision point. Instead of simply moving an object (as setPos/X/Y/Z do), setFluidPos/X/Y/Z methods ‘slide’ it from its old position to its new, guaranteeing no collisions are missed. There is another piece of the puzzle to make this work which we will discuss when we reach game.py below.
We have also doubled the maximum speed the player can fly at – for no reason other than for fun! Notice also that we have comments in the code by using triple-quotes (“”) instead of the usual hash (#). Triple quote comments can run over multiple lines whereas hash comments cannot. They also help with automatic code documentation – something for a future Issue but note it is what we used to create the design diagram earlier in this Issue.
Lastly, the ‘lookAtMe’ method sets a camera correctly with regards to the player. It’s a replacement to our old ‘updateCamera’ (essentially) but we have added a bit more magic in the camera trickery. The camera and player will both now roll during play and our new relative positioning gives some nice effects. The video below shows the new camera setup in action.
newgamefolder/volume1/game.py
from direct.showbase.ShowBase import ShowBase
from direct.task import Task
from pandac.PandaModules import CollisionTraverser, CollisionNode
from pandac.PandaModules import CollisionSphere, CollisionHandlerQueue
from panda3d.core import BitMask32, TextNode
from panda3d.core import NodePath, PandaNode
from direct.gui.OnscreenText import OnscreenText
import sys
from .environment import GameWorld
from .player import AlliedFlanker

class ArcadeFlightGame(ShowBase):
    def __init__(self):
        ShowBase.__init__(self)
        self.debug = False
        self.maxdistance = 400
        self.statusLabel = self.makeStatusLabel(0)
        self.collisionLabel = self.makeStatusLabel(1)

        self.player = AlliedFlanker(self.loader,self.render,self.taskMgr)
        self.world = GameWorld(1024,self.loader,self.render,self.camera)

        self.taskMgr.add(self.updateTask, "update")
        self.keyboardSetup()

        # performance and map to player so can't fly beyond visible terrain
        self.player.setMaxHeight(self.maxdistance)

        if self.debug == False:
            self.camLens.setFar(self.maxdistance)
        else:
            base.oobe()

        self.camLens.setFov(60)
        self.setupCollisions()
        self.textCounter = 0

    def makeStatusLabel(self, i):
        """ Create a status label at the top-left of the screen,
        Parameter 'i' is the row number """
        return OnscreenText(style=2, fg=(.5,1,.5,1), pos=(-1.3,0.92-(.08 * i)), \
                               align=TextNode.ALeft, scale = .08, mayChange = 1)

    def keyboardSetup(self):
        self.keyMap = {"left":0, "right":0, "climb":0, "fall":0, \
                        "accelerate":0, "decelerate":0, "fire":0}
        self.accept("escape", sys.exit)
        self.accept("a", self.setKey, ["accelerate",1])
        self.accept("a-up", self.setKey, ["accelerate",0])
        self.accept("z", self.setKey, ["decelerate",1])
        self.accept("z-up", self.setKey, ["decelerate",0])
        self.accept("arrow_left", self.setKey, ["left",1])
        self.accept("arrow_left-up", self.setKey, ["left",0])
        self.accept("arrow_right", self.setKey, ["right",1])
        self.accept("arrow_right-up", self.setKey, ["right",0])
        self.accept("arrow_down", self.setKey, ["climb",1])
        self.accept("arrow_down-up", self.setKey, ["climb",0])
        self.accept("arrow_up", self.setKey, ["fall",1])
        self.accept("arrow_up-up", self.setKey, ["fall",0])
        self.accept("space", self.setKey, ["fire",1])
        self.accept("space-up", self.setKey, ["fire",0])
        base.disableMouse() # or updateCamera will fail!

    def setKey(self, key, value):
        """ Used by keyboard setup """
        self.keyMap[key] = value

    def setupCollisions(self):
        self.collTrav = CollisionTraverser()

        # rapid collisions detected using below plus FLUID pos
        self.collTrav.setRespectPrevTransform(True)

        self.playerGroundSphere = CollisionSphere(0,1.5,-1.5,1.5)
        self.playerGroundCol = CollisionNode('playerSphere')
        self.playerGroundCol.addSolid(self.playerGroundSphere)

        # bitmasks
        self.playerGroundCol.setFromCollideMask(BitMask32.bit(0))
        self.playerGroundCol.setIntoCollideMask(BitMask32.allOff())
        self.world.setGroundMask(BitMask32.bit(0))
        self.world.setWaterMask(BitMask32.bit(0))

        # and done
        self.playerGroundColNp = self.player.attach(self.playerGroundCol)
        self.playerGroundHandler = CollisionHandlerQueue()
        self.collTrav.addCollider(self.playerGroundColNp, self.playerGroundHandler)

        # DEBUG as per video:
        if (self.debug == True):
            self.playerGroundColNp.show()
            self.collTrav.showCollisions(self.render)

    def updateTask(self, task):
        """ Gets added to the task manager, updates the player, deals with inputs,
        collisions, game logic etc. """
        self.player.calculate()
        self.actionInput()
        validMove = self.player.move(self.world.getSize())

        # lets not be doing this every frame...
        if validMove == False and self.textCounter > 30:
            self.statusLabel.setText("STATUS: MAP END; TURN AROUND")
        elif self.textCounter > 30:
            self.statusLabel.setText("STATUS: OK")
        if self.textCounter > 30:
            self.textCounter = 0
        else:
            self.textCounter = self.textCounter + 1
        self.updateCamera()

        self.collTrav.traverse(self.render)
        for i in range(self.playerGroundHandler.getNumEntries()):
            entry = self.playerGroundHandler.getEntry(i)
            if (self.debug == True):
                self.collisionLabel.setText("DEAD:"+str(globalClock.getFrameTime()))
            self.player.die()
        return Task.cont

    def actionInput(self):
        """ Used by updateTask to process keyboard input """
        if (self.keyMap["climb"]!=0):
            self.player.climb()
        elif (self.keyMap["fall"]!=0):
            self.player.dive()
        else:
            self.player.unwindVertical()

        if (self.keyMap["left"]!=0):
            self.player.bankLeft()
        elif (self.keyMap["right"]!=0):
            self.player.bankRight()
        else:
            self.player.unwindHorizontal()

        if (self.keyMap["accelerate"]!=0):
            self.player.accelerate()
        elif (self.keyMap["decelerate"]!=0):
            self.player.brake()

    def updateCamera(self):
        self.player.lookAtMe(self.camera)
This class is pretty much the replacement to our old MyApp class. It contains all of the game logic and makes use of the new classes we just discussed. Hopefully, it makes sense and you can see how the other classes (and their methods) are now used to fulfill the design. The second piece of our ‘rapid object collision’ solution is in this code too. As well as the setFluid methods we used in player.py, we also here make a call to ‘setRespectPrevTransform(True)’ on our collision traverser. This tells Panda3D to record previous frame positions. You only need to call this once in your code and then use the setFluid methods thereafter.
newgamefolder/main.py
from volume1.game import ArcadeFlightGame

app = ArcadeFlightGame()
app.run()
Think of main.py as your old mygame.py. It is the start of the game, what gets the ball rolling. Instead of now running ‘python mygame.py’ (or ‘ppython mygame.py’) you execute main.py instead. The game should now run if you try! If not, you may have missed something! When you get python errors at the command prompt – read them backwards. Python presents you with what is called a stack trace, the most meaningful error is usually the one spat out last!
4. Adding some sound!
We are going to add three sounds. A game starting sound of the pilot talking, an explosion when the player dies and the sound of the aircraft engine. You can download all of them below. Two of them were free on the Internet distributed with an attribution license (such a license allows for free use so long as credit is given). The engine sound is one we created ourselves. We’ll explain exactly how we did this in Issue 6 when we cover some basic audio editing.
- Download pilot talking. Credit to shawshank73.
- Download explosion. Credit to NoiseCollector.
- Download engine sound. We will explain how we made this sound in Issue 6.
(you may need to right-click/save-as depending on your browser/operating system)
Save the files in a new sub-directory called ‘sounds’ under your volume1 directory. The code changes to add the sounds to the game are as follows.
In game.py, at the end of the constructor, add:
        newGameSound = base.loader.loadSfx("volume1/sounds/gamestart.wav")
        newGameSound.play()
…this will result in the pilot sound file playing when the game is first launched. In player.py add the following to the constructor:
        self.engineSound = base.loader.loadSfx("volume1/sounds/engine1.wav")
        self.engineSound.setVolume(self.__speedAsPercentage())
        self.engineSound.setLoop(True)
        self.explosionSound = base.loader.loadSfx("volume1/sounds/explosion.wav")
It is vital to place the above code before the call to player.reset. As you will see momentarily, player.reset will be updated and will depend on the sound existing! The code above loads the engine sound and then sets the volume relative to the player speed. The idea is that the faster you fly the louder the engines are. We also call ‘setLoop’ to make the sound constantly play. It is around 5 seconds in length but we just repeat it over and over for a constant sound. Lastly, we load the explosion sound but do not play it (because the player hasn’t died yet!).
Add the following two lines to the end of the player reset method:
        self.engineSound.setVolume(self.__speedAsPercentage())
        self.engineSound.play()
At the end of the accelerate method:
self.engineSound.setVolume(self.__speedAsPercentage())
At the end of the brake method:
self.engineSound.setVolume(self.__speedAsPercentage())
In the die method, just before the setZ call:
            self.engineSound.stop()
            self.explosionSound.play()
Run the game and you should now find you have an introduction sound, a varying engine sound (varies by speed) and an explosion sound when you crash. Simples. 🙂
5. Adding a basic Heads Up Display (HUD)
You will need the two images below. To download, first click the image so the zoomed version appears on this page, then right-click and save. One is for an on screen RADAR, the other is a game information panel. Save them in a new sub-directory under volume1 called ‘gfx’.
Thanks to Zero Point Productions for providing the HUD images!
In the volume1 directory create a new Python file called gui.py, contents are as follows:
from direct.gui.DirectGui import DirectFrame, OnscreenImage
from pandac.PandaModules import TransparencyAttrib

class GameGUI():
    def __init__(self,render2d):
        self.render2d = render2d

        # image scale of 1 fills screen, position defaults to central
        Scale = 1.0/2.5 # decimal point is VITAL
        radar = OnscreenImage(image='volume1/gfx/radar.png', scale=Scale, \
                                parent=self.render2d, pos=(-0.95,0,-0.95))
        radar.setTransparency(TransparencyAttrib.MAlpha)
        # note the image itself and how it is centered

        hud = OnscreenImage(image='volume1/gfx/hud.png', scale=1, \
                                parent=self.render2d, pos=(0,0,0))
        hud.setTransparency(TransparencyAttrib.MAlpha)
Now edit game.py and add this import:
from .gui import GameGUI
Then add this in the ArcadeFlightGame constructor:
self.gui = GameGUI(self.render2d)
Run the game and you should see something like the below:
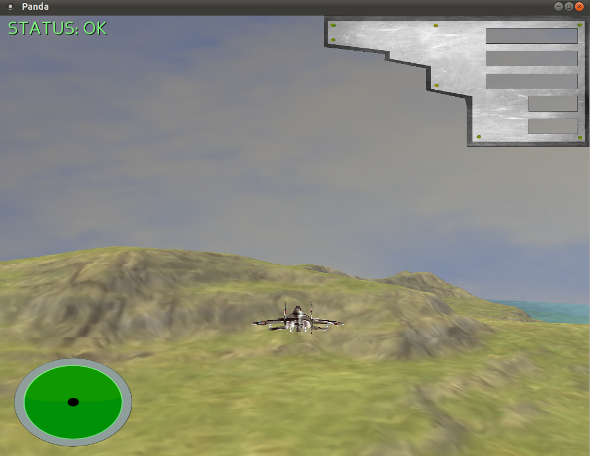
None of it works yet – there’s nothing on the RADAR and nothing on the information panel. All in good time! We’ll explain how the GUI code above works in Issue 6.
6. The Water from Issue 4
        # water
        self.water = self.loader.loadModel('volume1/models/square.egg')
        self.water.setSx(self.worldsize* 2)
        self.water.setSy(self.worldsize*2)
        self.water.setPos(self.worldsize/2,self.worldsize/2,18) # sea level
        self.water.setTransparency(TransparencyAttrib.MAlpha)
        nTS = TextureStage('1')
        self.water.setTexture(nTS,self.loader.loadTexture('volume1/models/water.png'))
        self.water.setTexScale(nTS,4)
        self.water.reparentTo(self.render)
        LerpTexOffsetInterval(self.water, 200, (1,0),(0,0), textureStage=nTS).loop()
We didn’t explain in Issue 4 how the new water works. The code above loads a small 1×1 square. It then scales it to be double the size of the world (hence there is water beyond the terrain). A transparency is set which is why the terrain can be seen through the water. A texture is then loaded and applied. This is done using a TextureStage. Do not worry about this for now, texture stages will be covered in the future. There isn’t really a ‘stage’ in this instance anyway as there is only one texture! Lastly, a lerp interval is set to move the water texture by an offset. This is the animation effect you see. Again, do not worry about this for now – there’s a whole Issue of content to cover when we reach intervals in detail!
7. What are these new files I see before me?
If you look in your ‘volume1’ directory you will see a number of new files ending with the extension ‘pyc’. What are these? Refer back to our discussion of interpreted and compiled languages in Issue 4. We pointed to Java as a ‘somewhere inbetween’ solution. In some ways, Python is too. Although it is an interpreted language, it is smart enough to compile a version of a Python file. The pyc file is a ‘byte-compiled’ version of the py file. If you edit/change your Python code, the interpreter will rebuild the necessary pyc file. If you don’t, the next time you play the game Python will only load the pyc file – it has no need to read and recompile the py source code. This is just a trick to allow for faster loading of a program. Execution speed is actually no different. Notice Python only does this for your ‘package’ files. It leaves your main.py alone, treating it as input to the interpreter (in other words, the actual Python script you execute is never compiled to a pyc).
8. Wrap up and Summary
That’s all for another Issue! We hope you enjoyed Issue 5 of MGF Magazine. Aside from the “fun stuff” (the sound and the HUD) there are some important concepts that have been covered. Again, to reiterate:
- An object has: Behaviour, Identity, State
- Object oriented offers: Inheritance, Encapsulation, Polymorphism
- Object oriented design encourages: Reuse, Extensibility and Maintainability
- Design while being conscious of: Coupling and Cohesion
…that’s pretty much modern software engineering in a nutshell! Portability (cross-platform) is also a good quality to aim for. Thankfully, we have that covered by our choice of programming language and game engine – Python and Panda3D, both of which are cross-platform.
