Welcome to Volume 2, the 3D Horror RPG. A far more involved game design relying on everything you learned in Volume 1, and more. If you remember, in Volume 1, Issue 1, we created a 3D world in an hour. We’re about to use equally clever tricks to generate a scary 3D House…
1. Ideas and Game Design
Volume 1 was pretty simple. You were the good guy. There were some bad guys. Everyone flew around trying to shoot each other to score. It was no more involved than that. Ergo, the media required little more than a game world, aircraft, firing sounds, a hud (etc.). We’re now, however, talking about a “Role Playing Game” (RPG), and by definition that means we need to take a whole lot more time considering what the game will be about and how it will look, feel and play. Some considerations:
- The basic game idea (story).
- Concepts (look and feel).
- Gameplay (single player, multi-player, mechanics).
- Game Characters (the player and non-player characters – NPCs).
- Game Progression / Level Design.
- The user interface / GUI.
- Other media (audio, music).
- …
Your plan / design needn’t be overly detailed. It’s really up to you, but, we would add that the more you have worked out in advance, the better.
2. The Volume 2 Game Concept
After taking his own life, Arthur Mann finds himself in a house, while a storm rages outside. No one can see Arthur, he is a ghost. He hears a voice, explaining that the punishment for taking his own life, is to take the lives of others. By all accounts, Arthur is now Death himself…
Simple enough, right? As an elevator pitch, it opens up a whole world of possibilities. Our thinking, is that our new RPG will be somewhat puzzle based (as most RPGs are, at least in part), and a little bit like the Final Destination films, only in reverse! The player, will have to work out how to kill off the residents of the house in bizairre, unusual, but plausible situations. As the game progresses, more of Arthur’s back story will be revealed and we’ll learn about the house residents (NPCs) before we off them in glorious gory horror style.
3. One 3D House, Fast!
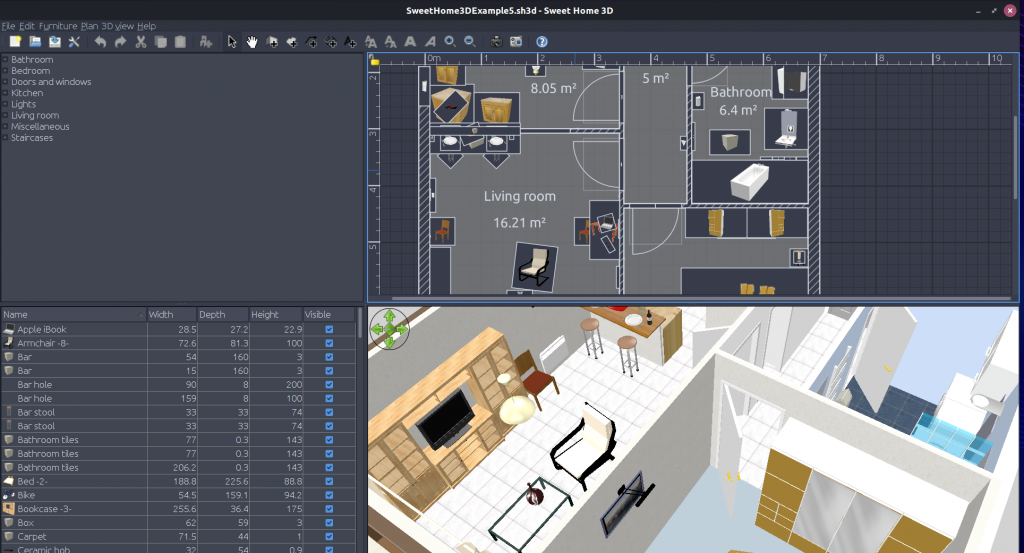
You might think creating a full 3D House would be very involved. Certainly a level beyond the 3D Terrain required for Volume 1. You would be correct and, well, not correct. It can be very involved, or we can get across the line far quicker if we’re not too picky. We’re going to use a free piece of software called Sweet Home 3D (downloads for Windows, Linux and Mac can be found at http://www.sweethome3d.com/download.jsp). Go ahead and install SH3D, and run the program
SH3D lets you draw floor plans, decorate interiors and exteriors, paint the walls, add furniture items, and a whole lot more. You could spend a large amount of time creating and tweaking your house in SH3D or, as we’re going to do, you could lean on one of their demo houses available here – http://www.sweethome3d.com/gallery.jsp. Simply select your preferred house, download the SH3D file, and hit File->Open from within SH3D to load the model.
We recommend creating a house with only one storey, at least the first time you attempt a game like this. We’ll discuss this more in a future issue. It essentially imposes some design decisions and development we’d sooner avoid, at least for now, in the spirit of “my game fast“.
We opted to use the example named “SweetHome3DExample5.sh3d“, you may wish to choose otherwise. You may also wish to modify the house, perhaps using these assets: http://www.sweethome3d.com/freeModels.jsp.
Whichever way, you should ultimately end up with something looking a bit like this:
We now need to have our new creation in a format that can used in our game. The SH3D format is specific to the software, and not something we can readily import elsewhere. From within SH3D, use the top menu and select 3D View -> Export to OBJ Format. We suggest saving the result in a dedicated folder since it will include 2 files being exported along with a number of images. The key 2 files are an OBJ file, that represents the 3D model, and a Material (MTL) that dictates how it should be painted, by leaning on the images (textures). The OBJ format is widely supported, you can read more about it on this Wikipedia page.
4. Oh my Godot!
Previously (Volume 1), we used the excellent Panda3D game engine. We discussed as far back as Issue 1 that there are various merits and pitfalls to different game engines. We are going to use the Godot Game Engine for Volume 2, and here are our reasons:
- An RPG game tends to rely heavily on positions, places, game items and similar. Godot benefits from…
- A powerful Visual Editor that takes the pain out of a lot of common tasks.
- A Scene System, which lends itself beautifully to an RPG.
- A Live Preview and Debugging tools.
- Well defined pipelines for artists and programmers alike.
- Options for scripting in C++, C#, Rust, Dim and more.
- Option to use a visual script editor or the Godot scripting language (GDScript).
- Cross platform support including Mac, Linux, Windows, Android, iOS, Nintendo Switch, PS4, XBOX and the Web (HTML and Web Assembly).
Go ahead and download Godot for your platform (https://godotengine.org/download). Once you have it up and running, you will first be hit by the Godot Project Manager. Hit “New Project” on the right hand side, then select where to store the game (take note of this location, you’ll need it again very soon!). You should now see something like this:
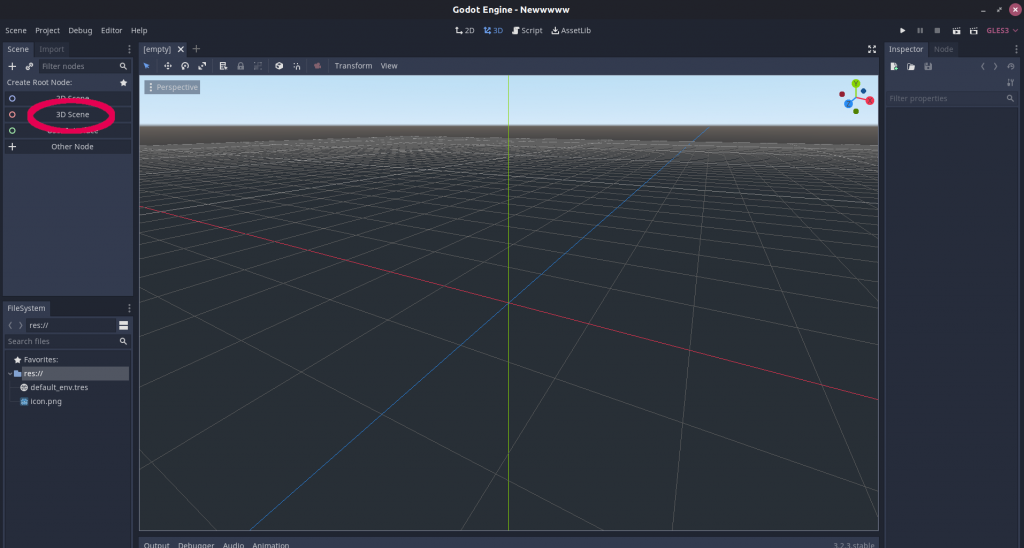
In the screen shot above, note we have highlighted “3D Scene” under “Create Root Node”. Much like Panda3D was, Godot is a Node Based system. To get anywhere, we need to create a “root” for our game. Go ahead and click 3D Scene. The Create Root Node panel will disappear, and a new Scene Tree will be shown in its place. The scene will have a single node (our root node), named “Spatial” by default. Double click the name and you can change it. We called it “HauntedHouse” since, well, that’s what we’re making here! When you have done this, using the top menu hit Scene->Save Scene.
5. Home Sweet Home
At this point, we have a Godot project with a single scene, and exported OBJ/MTL/Image files from Sweet Home 3D. It’s time to add the house to our scene. If you look at the bottom left of the Godot screen shot above, you will see the “File System” tab. This shows all of the content you have for your game, as stored in the Project Folder (whichever location you chose when you created the project!). Navigate to your projects location (folder), using a file manager or command line. Create a new folder there called “models” and a sub-folder therein called “house”. Now copy your SH3D OBJ, MTL and exported image files to this new sub-folder.
Switch back to Godot, and you should see the File System tab has updated. Double click into models, and then drag the OBJ file from the File System tab to the main 3D view (stage) in the centre of the screen. Select the newly imported model from the Scene Tree. Notice that the “Inspector” panel on the right hand side of the screen updates to show all the details of the model. You can also rename it using the Scene Tree, exactly as we did for the main scene. Now un-select the model (click an empty area in the Scene Tree or by clicking into empty space in the 3D preview window), so we can look around.
Troubleshooting: If you find Godot is not importing your model, you may need to tweak the project memory settings. From the top menu, navigate to Project -> Project Settings -> Memory -> Memory Limits and change the Message Queue from 1024KB to 2048KB.
The house, to begin with, is rather large. Use the middle mouse button to zoom in and out, and the right mouse button to look around. You can use the left mouse button to select the house, and then click-drag to reposition it. First, lets scale the house now to more a sensible size and position for the game world. Click on the house so that the Inspector shows the instance we dropped on the world. You are now editing the instance.
Expand the “Transform” tab under “Spatial” in the Inspector:
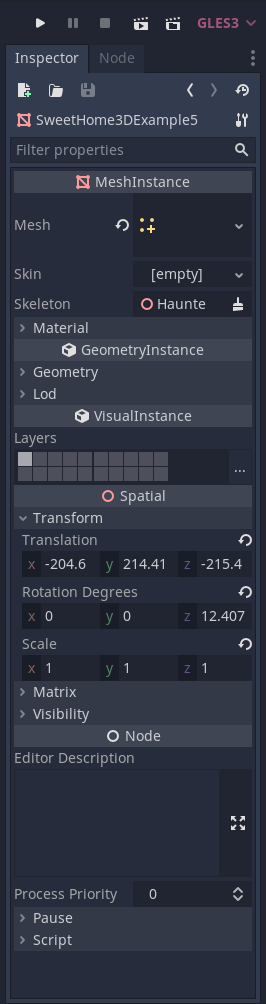
Use the 3 Scale settings (X, Y and Z) to resize the house. In our instance, the house became a much more reasonable size at 0.2, 0.2 and 0.2. Similarly, set the rotation values to 0, 0, 0. Finally, position the house over the main game area (the grid you can see in the 3D viewer), just above sea level, by setting the Transform values. For the house we are using, we found the values of -75, 1 and -100 to work well.
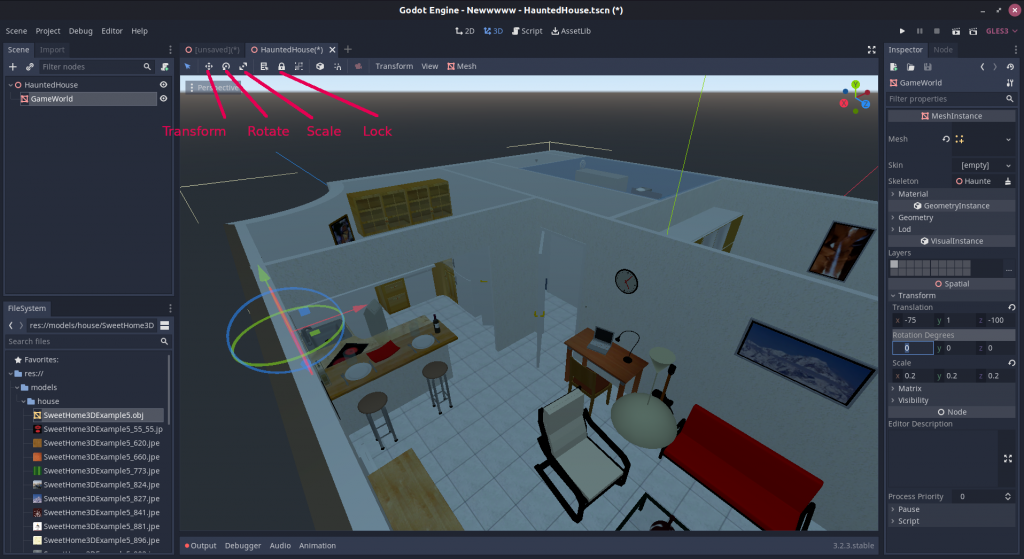
You can also do this using the 3D preview, though it’s a bit less accurate. Simply select the house (from the scene tree, noting you can click on an empty part of the tree to clear your selection) and you will see 3 arrows appear for moving the model. You can use the tools in the 3D preview to switch to changing the rotation, scale and other parameters. Finally, you can “lock” the model in position to prevent it being accidentally moved in future. The screen shot below summarises this:
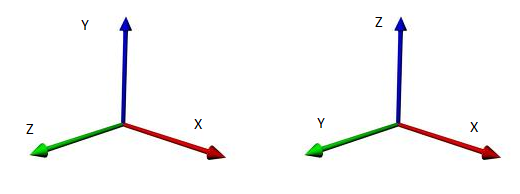
6. Why Y-Up?
Well done if you spotted that one! You might recall when we were using Panda3D that Z was up! X and Y dictated position, Z height. Yet, here were are in Godot, and it’s the not the same! In Godot, Y is up. It’s not a massive difference once you get used to it, but is of course necessary knowledge to progress! Game engines do not all use the same coordinate system.
7. Where has my stuff gone?
If you quit the Godot editor, restart it, and then open your project… you’ll find a completely empty stage again! Don’t worry. Assuming you saved your scene, it is still there! You can either double click it in the File System explorer or hit Scene->Load Scene from the top menu. Phew! We’ll address this in the next section by assigning our scene as the “default scene” for the project (in other words, the scene that the game starts on and also the scene Godot will open by default for this project!).
8. Play the Game!
Look back to the screen shot of the node Inspector we showed earlier. Across the top, you will see control buttons – play, pause, stop and similar. Go ahead and hit the Play button. You will get a popup warning from Godot saying that no default scene has been assigned, and would you like to use the current scene as the default. Select OK. This will resolve the issue in the previous section (“where has my stuff gone?”), and also attempt to play the game.
What you’ll find, when the game starts, is … absolutely nothing! Just a blank screen. Why is this?
You might remember in previous issues, using Panda3D, we had to set up a game camera. Godot is no different. You need at least one camera to be able to see anything in a scene! Go ahead and right click on the root node in the Scene Tree. From the menu that appears, select “Add a Child Node“. A long list of possible nodes will be presented to you, thankfully with a useful search box!
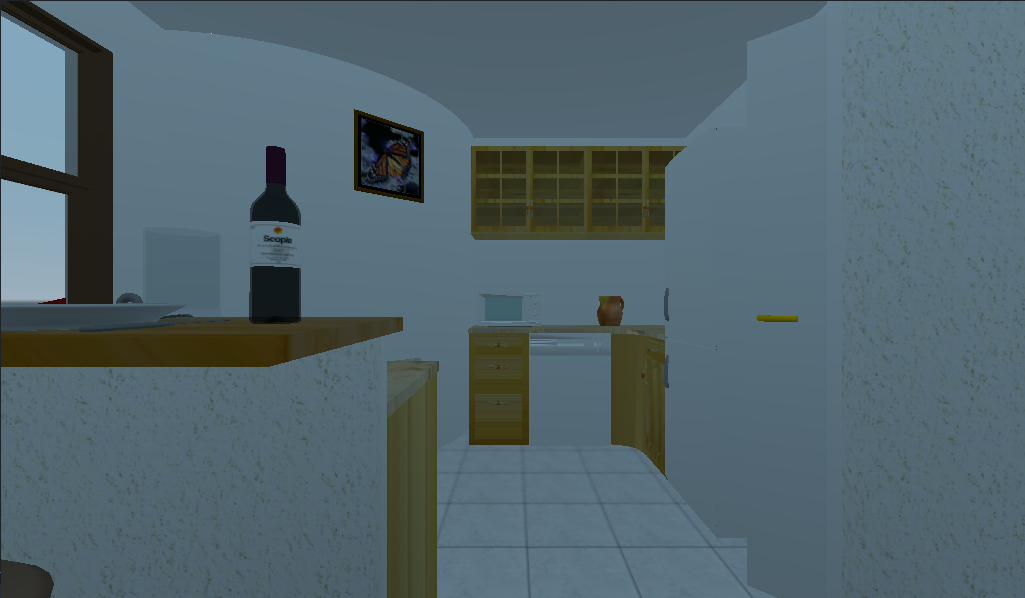
Search for “camera”. Select camera and then hit the Create button. Voila, a camera is added to the scene! Much like the 3D model of the house, the camera has a position (transform), rotation and similar. This is true of all nodes (refer back to “By the power of inheritance!” in Issue 6). It also has some attributes unique to itself such as, for example, the field of view (FOV). Position the camera exactly where you would like the game to start. Now hit the “Play” button again and you should see something more interesting than a blank screen:
Our camera, in this instance, is a perspective camera, by default, and that’s fine for this project. Godot also supports Orthogonal and Frustum cameras. We won’t dwell on this for now, but note that all cameras must register with a Viewport node, which our main root node is!
9. Wrap up and Summary
A fair amount of ground covered quickly! We have installed and began to use a new game engine (Godot), found a way to create our 3D Interior (Sweet Home 3D), added our interior and positioned a camera to view the scene. The links below are recommended reading prior to the next issue:
- Getting started with Godot: https://docs.godotengine.org/en/stable/getting_started/step_by_step/index.html
- Types of Camera in Godot: https://docs.godotengine.org/en/stable/classes/class_camera.html
- The Godot Scene Tree: https://docs.godotengine.org/en/stable/getting_started/step_by_step/scene_tree.html
- Godot Viewports: https://docs.godotengine.org/en/stable/classes/class_viewport.html#class-viewport