In Issue 2 we will focus on getting your game’s main character (player) into the world you created in Issue 1! In order to do this, we do need to cover some tricky concepts. Issue 2 will be one of the most difficult issues for new developers but we encourage you to persevere, once you have understood the concepts in this Issue life will get easier!
1. Issue 1 revisited
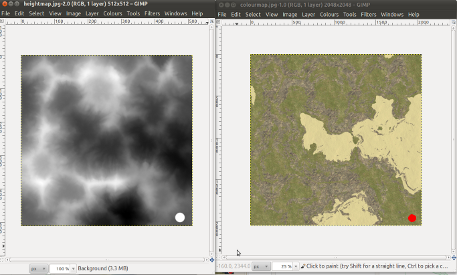
Those paying very close attention to Issue 1 may have noticed something odd happening. Consider the image below showing both a height map and texture map:

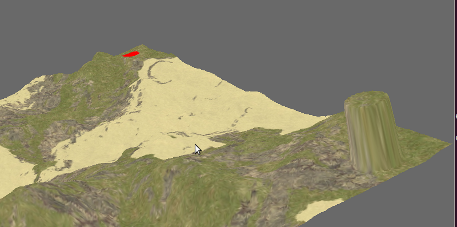
Notice the white dot and the red dot. You would, then, quite rightly expect the output to show a very high column with a red dot on the top. It doesn’t. Instead, you’ll see this:

Notice we have our nice high column but that the red dot is on the other side of the terrain! We actually raised this concern with the Panda3D community as a potential bug in the engine. Turns out to be more about convention and how one approaches terrain building in this way. You can see that discussion, if you interested, over on the Panda3D Forums. The main thing however is that we have a problem and we need to fix it. The fix is simple – flip the texture map vertically as outlined below.
2. Some basic image editing
If you have done image editing before you can skip this section and simply flip your image vertically. If you haven’t, keep reading! To edit an image you need an image editing application. There are many and they vary wildly in terms of functionality and price. As always at MGF Magazine, we prefer to stick with software that is free so you can get going right away with the minimum of fuss. Our recommendation is the GNU Image Manipulation Program (GIMP for short). While natively a Linux application, there are working ports for both Windows and Mac OS. The links are as follows:
If you run into problems with GIMP on Windows or Mac OS X, we consider the following alternatives worthy: Paint.NET (for MS Windows) and Seashore (for Mac OS).
Now, to fix our image, do the following (instructions assume you are using GIMP):
- File->Open, navigate to the folder containing the image and open it.
- Image->Transform, flip vertically.
- File->Overwrite
- Exit GIMP
3. Speed up for Issue 1 and some code explanation
In Issue 1, we indicated that the load time for your game might be quite high. We pointed out the main culprit as being the line in our code where we wrote “setBruteForce(True)”. This causes the Panda3D engine to render the entire terrain in full detail for us. Hence the delay. Now, you don’t always have to use the brute force approach. You can specify a Level of Detail (LOD). For example – we could specify a high LOD around where we position our in game camera (what the player sees). We could then lower the LOD on the surrounding area as it is not being viewed (your virtual world still ‘exists’ beyond what the camera sees). This improves game performance, your PC simply does not have to work as hard.
That said, for this game, we propose a far simpler method. The method above is more geared towards very large terrains. In our case, the game world is not that large. We don’t need levels of detail or terrain generation. What we need are 3D models. A 3D model can easily be loaded directly into our game – no ‘generation’ or levels of detail and much faster load times.
Alter your code from Issue 1 to match what you see below. There is only one change – the addition of the line 15 (beginning root.writeBamFile):
from direct.showbase.ShowBase import ShowBase   # the core of Panda3D
from panda3d.core import GeoMipTerrain          # Panda3D terrain library

class ShooterGame(ShowBase):                    # our 'class' ('object' recipe)
    def __init__(self):                         # initialise object
        ShowBase.__init__(self)                 # initialise panda3d
        terrain = GeoMipTerrain("worldTerrain") # create a terrain
        terrain.setHeightfield("heightmap.png") # set the height map
        terrain.setColorMap("texturemap.png")   # set the colour map
        terrain.setBruteforce(True)             # level of detail
        root = terrain.getRoot()                # capture root
        root.reparentTo(render)                 # render from root
        root.setSz(60)                          # maximum height
        terrain.generate()                      # generate terrain
        root.writeBamFile('world.bam')          # create 3D model

my_shooter_game = ShooterGame()                 # our object 'instance'
my_shooter_game.run()
Now run your game as normal. Once it is running, quit. Look in the directory where your mygame.py file resides. Notice that new file, “world.bam”? We just got the Panda3D engine to generate our terrain at the highest level of detail and then, once complete, write that out into a new file. In Panda3D there are essentially two model file types – BAM files as you just saw and EGG files which you will see soon. Don’t worry about the differences for now, all will become clear!
Having done this, we now need to modify our code to load the model instead of generating the terrain. Create a new Python file, save this one as mygame2.py or similar (while you no longer need the original file, mygame.py, we strongly recommend you keep it so that you can go through this process again in the future) and write it as follows:
from direct.showbase.ShowBase import ShowBase
from panda3d.core import GeoMipTerrain

class ShooterGame(ShowBase):
    def __init__(self):
        ShowBase.__init__(self)
        self.world = self.loader.loadModel("world.bam")
        self.world.reparentTo(self.render)

my_shooter_game = ShooterGame()
my_shooter_game.run()
Execute the program exactly as you did in Issue 1 (only launch mygame2.py and not your old version mygame.py!). Notice how quick that loaded? Add to that our now ‘much shorter’ program and progress is good, the code will do exactly the same as the code from Issue 1 only without the overhead of terrain generation on every execution. We will now explain to you what the code you wrote is doing line by line.