5. Understanding our HUD
Take a look back now at the HUD code we added in Issue 5:
from direct.gui.DirectGui import DirectFrame, OnscreenImage
from pandac.PandaModules import TransparencyAttrib

class GameGUI():
    def __init__(self,render2d):
        self.render2d = render2d

        # image scale of 1 fills screen, position defaults to central
        Scale = 1.0/2.5 # decimal point is VITAL
        radar = OnscreenImage(image='volume1/gfx/radar.png', scale=Scale, \
                                         parent=self.render2d, pos=(-0.95,0,-0.95))
        radar.setTransparency(TransparencyAttrib.MAlpha)
        # note the image itself and how it is centered

        hud = OnscreenImage(image='volume1/gfx/hud.png', scale=1, \
                                      parent=self.render2d, pos=(0,0,0))
        hud.setTransparency(TransparencyAttrib.MAlpha)
It’s generally straight forward. It loads and places two images on the screen – the RADAR and the main HUD information area. What is different (and often confusing to new comers) is the scaling and positioning.
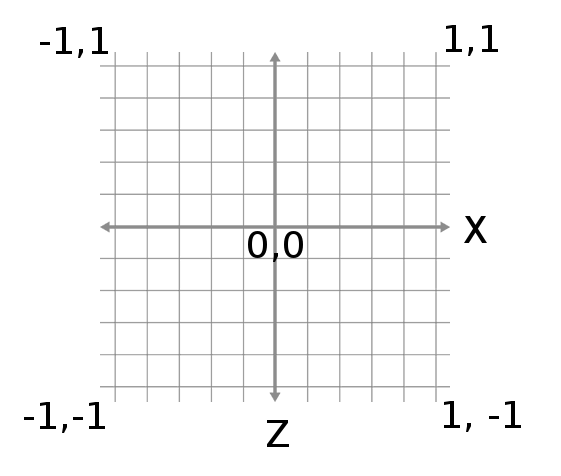
Thus far in MGF we have only dealt with 3D objects and 3D positioning. Things change a little in the 2D world. First of all, coordinates are given via X and Z values. Y means nothing. The values are also in a much smaller range. It is important to understand that if you place an image at a position of 0,0 and a scale of 1 it will fill the whole screen and be exactly centered on the screen. Once you get used to this idea life becomes a lot simpler. The diagram below aims to clarify what we are describing:

6. Making the RADAR function
Our aim is to represent the whole scene on the RADAR area of the HUD. The tricky part is having the player always central and everything else positioned relative to this. We also want to capture the players heading in the RADAR to complete its functionality. Update your GUI code to read as follows:
from direct.gui.DirectGui import OnscreenImage
from pandac.PandaModules import TransparencyAttrib

class GameGUI():
    def __init__(self,render2d):
        self.render2d = render2d

        # image scale of 1 fills screen, position defaults to central
        self.radar = OnscreenImage(image='volume1/gfx/radar.png', scale=(1.0/2.5), \
                                   parent=self.render2d, pos=(-0.95,0,-0.95))
        self.radar.setTransparency(TransparencyAttrib.MAlpha)

        hud = OnscreenImage(image='volume1/gfx/hud.png',scale=1,parent=self.render2d, \
                            pos=(0,0,0))
        hud.setTransparency(TransparencyAttrib.MAlpha)
        self.dots = list()
        self.playerobj = OnscreenImage(image='volume1/gfx/playerdot.png', \
                                       scale=1.0/20.0,parent=self.radar)
        self.playerobj.setTransparency(TransparencyAttrib.MAlpha)

    def update(self, centerObject, objectList, boundingBox):
        boundingBox = boundingBox * 2
        offsetX = 0.0
        offsetZ = 0.0

        # would be fine for minimap
        self.playerobj.setX(centerObject.getX()/boundingBox)
        self.playerobj.setZ(centerObject.getY()/boundingBox)

        # player center
        if (self.playerobj.getX() > 0.5):
            offsetX = -(self.playerobj.getX()-0.5)
        elif (self.playerobj.getX() < 0.5):
            offsetX = 0.5-self.playerobj.getX()
        # else stays zero
        if (self.playerobj.getZ() > 0.5):
            offsetZ = -(self.playerobj.getZ()-0.5)
        elif (self.playerobj.getZ() < 0.5):
            offsetZ = 0.5-self.playerobj.getZ()

        self.playerobj.setX(self.playerobj.getX()+offsetX)
        self.playerobj.setZ(self.playerobj.getZ()+offsetZ)

        for dot in self.dots:
            dot.removeNode() # correct way to remove from scene graph
        del self.dots[:]
        self.playerobj.setR(-centerObject.getH()-90)

        for obj in objectList:
            newobj = OnscreenImage(image='volume1/gfx/reddot.png',scale=1.0/60.0, \
                                   parent=self.radar)
            newobj.setTransparency(TransparencyAttrib.MAlpha)
            newobj.setX(obj.getX()/boundingBox)
            newobj.setZ(obj.getY()/boundingBox)
            newobj.setX(newobj.getX()+offsetX)
            newobj.setZ(newobj.getZ()+offsetZ)
            self.dots.append(newobj) # so can destroy, see call above
For the code to work, you will need the two images referenced. They can be downloaded below. Place them in your ‘gfx’ sub-directory:
- Download reddot.png (right-click, save as)
- Download playerdot.png (right-click, save as)
You will also need to call the new update method in the updateTask method of ArcadeFlightGame (in game.py):
self.gui.update(self.player, self.baddies, self.world.getSize())
Arguably, we have could added the GUI update to the task manager instead, the same way we added updateTask back in Issue 3. This is a decision you can make for yourself – lean on/rely on the task manager or, as we have done here, add only one “update” method to the task manager and call other needed methods from it. It’s really a preference decision and nothing much else. Finally, add the following methods to the AlliedFlanker class in player.py:
    def getX(self):
        return self.player.getX()

    def getY(self):
        return self.player.getY()

    def getH(self):
        return self.player.getH()
Note they will be available to the EnemyFlanker class too via inheritance. Run the game again and you should find you have a fully functional RADAR making is much easier to locate the enemy! The enemy still appears quite small and can be hard to spot. We updated our enemy constructor with a call to:
self.player.setScale(0.5)
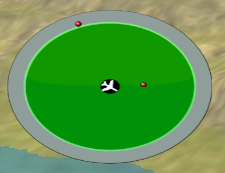
This makes the enemy larger and a little easier to see! As you fly around, you will see the player icon rotate to indicate heading while red dots will indicate enemy positions. You should now find it quite easy to locate the enemy on your map! Remember, the enemies are positioned at a height of 100 (the same as the player’s start height). The image below shows the RADAR in action:

How does it work? The magic is in the update method. The code achieves the following:
- Double the bounding box value. The value details the world size (1024) and we need to scale everything on the RADAR accordingly. However, we plan to have the player centred on the RADAR. Thus, the maximum distance an enemy could be from the player at any point in the game is 1024. This means the distance from the RADAR centre to its edge should (i.e., its radius) should be able to capture a whole worlds width (1024) making the total RADAR width (diameter) equal to double the bounding box.
- Create some offset values, initially zero.
- When we created the player dot in the constructor we set the parent to self.radar and, because of this, positioning the dots on the RADAR now operates on coordinates between 0,0 (bottom left) and 1,1 (top right). Our code positions the player dot on the RADAR based on its position. If we were adding a mini-map/overhead map we would be done now. We are not done because we want the player to always be central on the RADAR. So why did we bother at all (as opposed to simply positioning the player dot to 0.5,0.5 in the constructor)? Read on!
- We go on to calculate the X,Z movement required to re-centre the player. This might seem pointless but it is not. Calculating what needs to be done to correct the players position gives us two offset values. We can use these same values thereafter to correctly adjust the position of the enemy (red) dots keeping the whole RADAR correct relative to the player sat in the middle.
- Move the player via the offsets.
- Delete every entry in our list of “dots”. Every time we perform a RADAR update an enemy may have moved, the player may have moved, enemies might have been created or destroyed and so we’re not even certain how many there are. We do, however, always need to maintain a list of the “last RADAR positions” so we can clear/wipe the RADAR. Failure to do this would result in “trails” on the RADAR.
- Update the heading of the players icon/dot. This captures the players heading on the screen.
- Go through the list of bad guys. For each, create a red dot. Position the red dot. Adjust via the calculated offsets. Store the dot in the list of dots so we can delete it on the next pass.
Not a bad little RADAR for such a short amount of code!
7. Some final Tweaks
You have seen several times now how software is iterative and ‘things change’. With the bad guys/RADAR on the screen we’re beginning to get a feel for how the game might play. Based on that, we made a few more tweaks to our code to make it feel like a smoother experience.
An update to ‘calculate’ in player.py:
    def calculate(self):
        """ Should be called every frame.
        It calculates how the player should move (position and orientation) """
        self.factor = globalClock.getDt()
        self.scalefactor = self.factor *self.speed
        self.climbfactor = self.scalefactor * 0.3
        self.bankfactor  = self.scalefactor * 0.5
        self.speedfactor = self.scalefactor * 2.9
        self.gravityfactor = ((self.maxspeed-self.speed)/100.0)*0.75 #1.35
Updates to bank left/right in player.py:
    def bankLeft(self):
        if (self.speed > 0):
            self.player.setH(self.player.getH()+ (2*self.bankfactor))
            self.player.setP(self.player.getP()+self.bankfactor)
            # quickest return:
            if (self.player.getP() >= 180):
                self.player.setP(-180)

    def bankRight(self):
        if (self.speed > 0):
            self.player.setH(self.player.getH()- (2*self.bankfactor))
            self.player.setP(self.player.getP()-self.bankfactor)
            if (self.player.getP() <= -180):
                self.player.setP(180)
8. Wrap up and Summary
Another productive Issue! We have successfully added the bad guys to the scene while reusing as much code as possible, added camera toggling, created a fully functional RADAR and done some final tidying and tweaking. Join us in Issue 7 where we will tackle the problem of end-users (players) operating in different screen resolutions. There’s much more, of course, but we always like to end with a small teaser as we’re sure you noticed! (oh OK, hint: think…. Artificial Intelligence :-P)