4. Oh my Godot!
Previously (Volume 1), we used the excellent Panda3D game engine. We discussed as far back as Issue 1 that there are various merits and pitfalls to different game engines. We are going to use the Godot Game Engine for Volume 2, and here are our reasons:
- An RPG game tends to rely heavily on positions, places, game items and similar. Godot benefits from…
- A powerful Visual Editor that takes the pain out of a lot of common tasks.
- A Scene System, which lends itself beautifully to an RPG.
- A Live Preview and Debugging tools.
- Well defined pipelines for artists and programmers alike.
- Options for scripting in C++, C#, Rust, Dim and more.
- Option to use a visual script editor or the Godot scripting language (GDScript).
- Cross platform support including Mac, Linux, Windows, Android, iOS, Nintendo Switch, PS4, XBOX and the Web (HTML and Web Assembly).
Go ahead and download Godot for your platform (https://godotengine.org/download). Once you have it up and running, you will first be hit by the Godot Project Manager. Hit “New Project” on the right hand side, then select where to store the game (take note of this location, you’ll need it again very soon!). You should now see something like this:
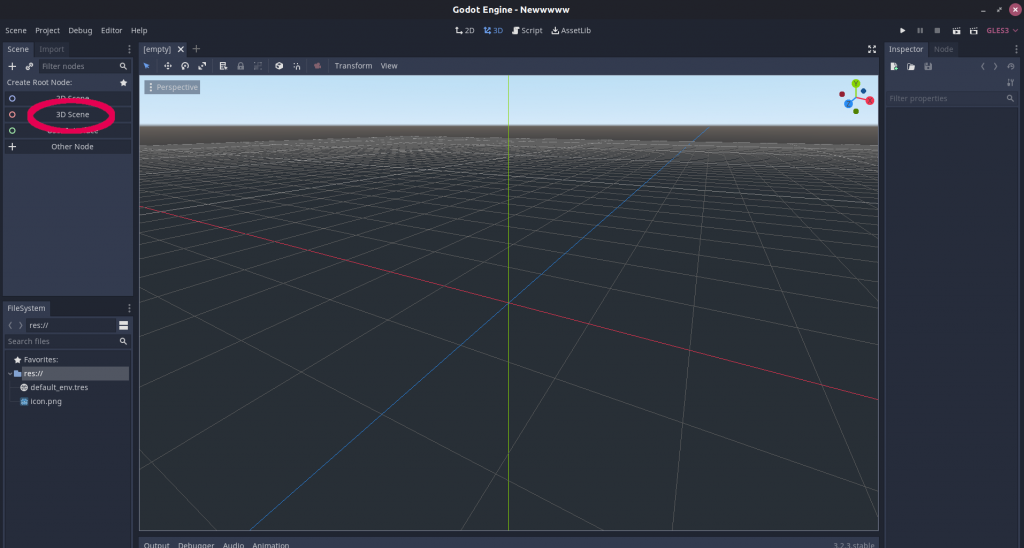
In the screen shot above, note we have highlighted “3D Scene” under “Create Root Node”. Much like Panda3D was, Godot is a Node Based system. To get anywhere, we need to create a “root” for our game. Go ahead and click 3D Scene. The Create Root Node panel will disappear, and a new Scene Tree will be shown in its place. The scene will have a single node (our root node), named “Spatial” by default. Double click the name and you can change it. We called it “HauntedHouse” since, well, that’s what we’re making here! When you have done this, using the top menu hit Scene->Save Scene.
5. Home Sweet Home
At this point, we have a Godot project with a single scene, and exported OBJ/MTL/Image files from Sweet Home 3D. It’s time to add the house to our scene. If you look at the bottom left of the Godot screen shot above, you will see the “File System” tab. This shows all of the content you have for your game, as stored in the Project Folder (whichever location you chose when you created the project!). Navigate to your projects location (folder), using a file manager or command line. Create a new folder there called “models” and a sub-folder therein called “house”. Now copy your SH3D OBJ, MTL and exported image files to this new sub-folder.
Switch back to Godot, and you should see the File System tab has updated. Double click into models, and then drag the OBJ file from the File System tab to the main 3D view (stage) in the centre of the screen. Select the newly imported model from the Scene Tree. Notice that the “Inspector” panel on the right hand side of the screen updates to show all the details of the model. You can also rename it using the Scene Tree, exactly as we did for the main scene. Now un-select the model (click an empty area in the Scene Tree or by clicking into empty space in the 3D preview window), so we can look around.
Troubleshooting: If you find Godot is not importing your model, you may need to tweak the project memory settings. From the top menu, navigate to Project -> Project Settings -> Memory -> Memory Limits and change the Message Queue from 1024KB to 2048KB.
The house, to begin with, is rather large. Use the middle mouse button to zoom in and out, and the right mouse button to look around. You can use the left mouse button to select the house, and then click-drag to reposition it. First, lets scale the house now to more a sensible size and position for the game world. Click on the house so that the Inspector shows the instance we dropped on the world. You are now editing the instance.
Expand the “Transform” tab under “Spatial” in the Inspector:
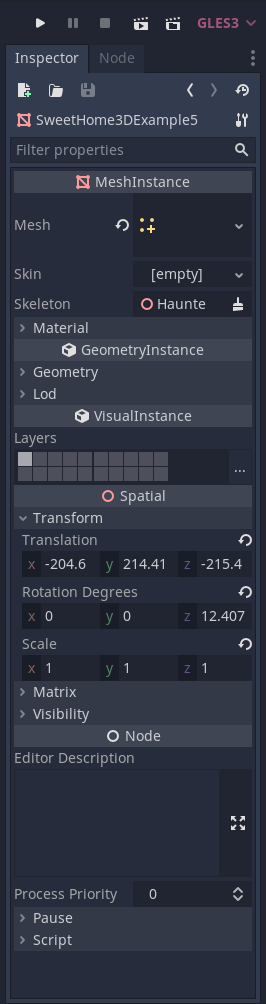
Use the 3 Scale settings (X, Y and Z) to resize the house. In our instance, the house became a much more reasonable size at 0.2, 0.2 and 0.2. Similarly, set the rotation values to 0, 0, 0. Finally, position the house over the main game area (the grid you can see in the 3D viewer), just above sea level, by setting the Transform values. For the house we are using, we found the values of -75, 1 and -100 to work well.
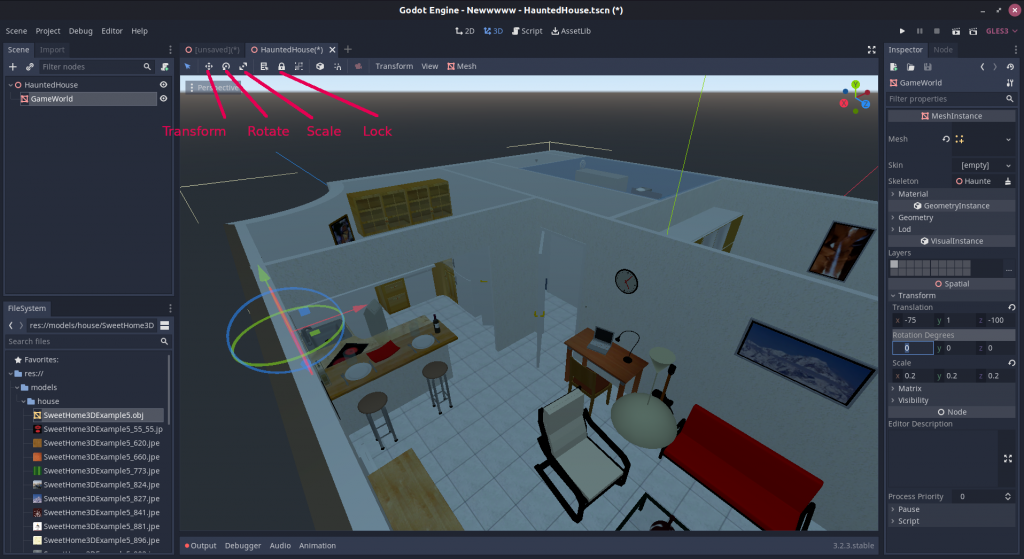
You can also do this using the 3D preview, though it’s a bit less accurate. Simply select the house (from the scene tree, noting you can click on an empty part of the tree to clear your selection) and you will see 3 arrows appear for moving the model. You can use the tools in the 3D preview to switch to changing the rotation, scale and other parameters. Finally, you can “lock” the model in position to prevent it being accidentally moved in future. The screen shot below summarises this: